Securely Connect Remote IoT P2P SSH Ubuntu Server: A Beginner-Friendly Guide
Hey there, tech enthusiasts! If you're diving into the world of IoT and remote server management, you've probably come across the term "securely connect remote IoT P2P SSH Ubuntu server." Sounds intimidating, right? But don't worry—we've got your back. In this article, we'll break it down step by step, making it super easy for you to grasp. Whether you're a seasoned developer or just starting out, this guide will walk you through everything you need to know.
So, why exactly is securely connecting your remote IoT devices via SSH on an Ubuntu server so important? Well, in today's digital age, security is king. With hackers lurking around every corner, ensuring that your IoT devices are protected is crucial. We'll cover everything from setting up your Ubuntu server to configuring SSH for peer-to-peer communication. Trust me, by the end of this, you'll be a pro at it.
Before we dive deep into the technicalities, let’s talk about the importance of securing your IoT devices. Imagine this: your smart home devices are connected to the internet, but without proper security measures, anyone could potentially access them. That’s a scary thought, isn’t it? By learning how to securely connect your IoT devices using SSH on an Ubuntu server, you’re not just protecting your data—you’re also safeguarding your privacy.
Read also:Cindy Crawford Reflects On Her Career And Shares Lessons With Her Kids
What is SSH and Why Should You Care?
First things first, let’s understand what SSH actually is. SSH, or Secure Shell, is a cryptographic network protocol that allows you to securely connect to a remote computer or server. It’s like having a secret handshake with your server, ensuring that no one else can eavesdrop on your conversations. When it comes to securely connect remote IoT P2P SSH Ubuntu server, SSH is your best friend.
Here’s why SSH is so important:
- It encrypts all data transmitted between your device and the server, keeping prying eyes away.
- It provides authentication, ensuring that only authorized users can access your server.
- It’s widely supported and easy to set up, even for beginners.
For those of you managing IoT devices, SSH offers a secure way to control and monitor them remotely. Whether you’re running a smart home setup or managing industrial IoT devices, SSH is the go-to solution for secure communication.
Why Choose Ubuntu Server for IoT?
Now that we’ve got SSH covered, let’s talk about why Ubuntu Server is the perfect choice for your IoT setup. Ubuntu is a Linux-based operating system that’s known for its stability, security, and ease of use. When it comes to securely connect remote IoT P2P SSH Ubuntu server, Ubuntu Server ticks all the boxes.
Here are some reasons why Ubuntu Server is ideal for IoT:
- It’s lightweight and can run on a variety of hardware, from Raspberry Pi to powerful servers.
- It has a massive community of developers and users who contribute to its security and functionality.
- It’s free and open-source, meaning you don’t have to break the bank to get started.
With Ubuntu Server, you can set up a secure and reliable environment for your IoT devices. Plus, its compatibility with SSH makes it a no-brainer for anyone looking to securely connect their devices.
Read also:Sophia Lorens Cookbooks A Rare Gem Worth Discovering
Step-by-Step Guide to Securely Connect Remote IoT P2P SSH Ubuntu Server
Alright, let’s get our hands dirty and set up a secure connection between your IoT devices and your Ubuntu server using SSH. Follow these steps carefully, and you’ll be up and running in no time.
Step 1: Install Ubuntu Server
The first step is to install Ubuntu Server on your machine. You can download the latest version from the official Ubuntu website. Once you’ve downloaded the ISO file, burn it onto a USB drive and boot your machine from it. Follow the on-screen instructions to complete the installation process.
Step 2: Configure SSH on Ubuntu Server
After installing Ubuntu Server, the next step is to enable SSH. By default, SSH is not installed on Ubuntu Server, so you’ll need to install it manually. Open your terminal and type the following command:
sudo apt update && sudo apt install openssh-server
Once the installation is complete, you can check if SSH is running by typing:
sudo systemctl status ssh
If everything is set up correctly, you should see a message saying that SSH is active and running.
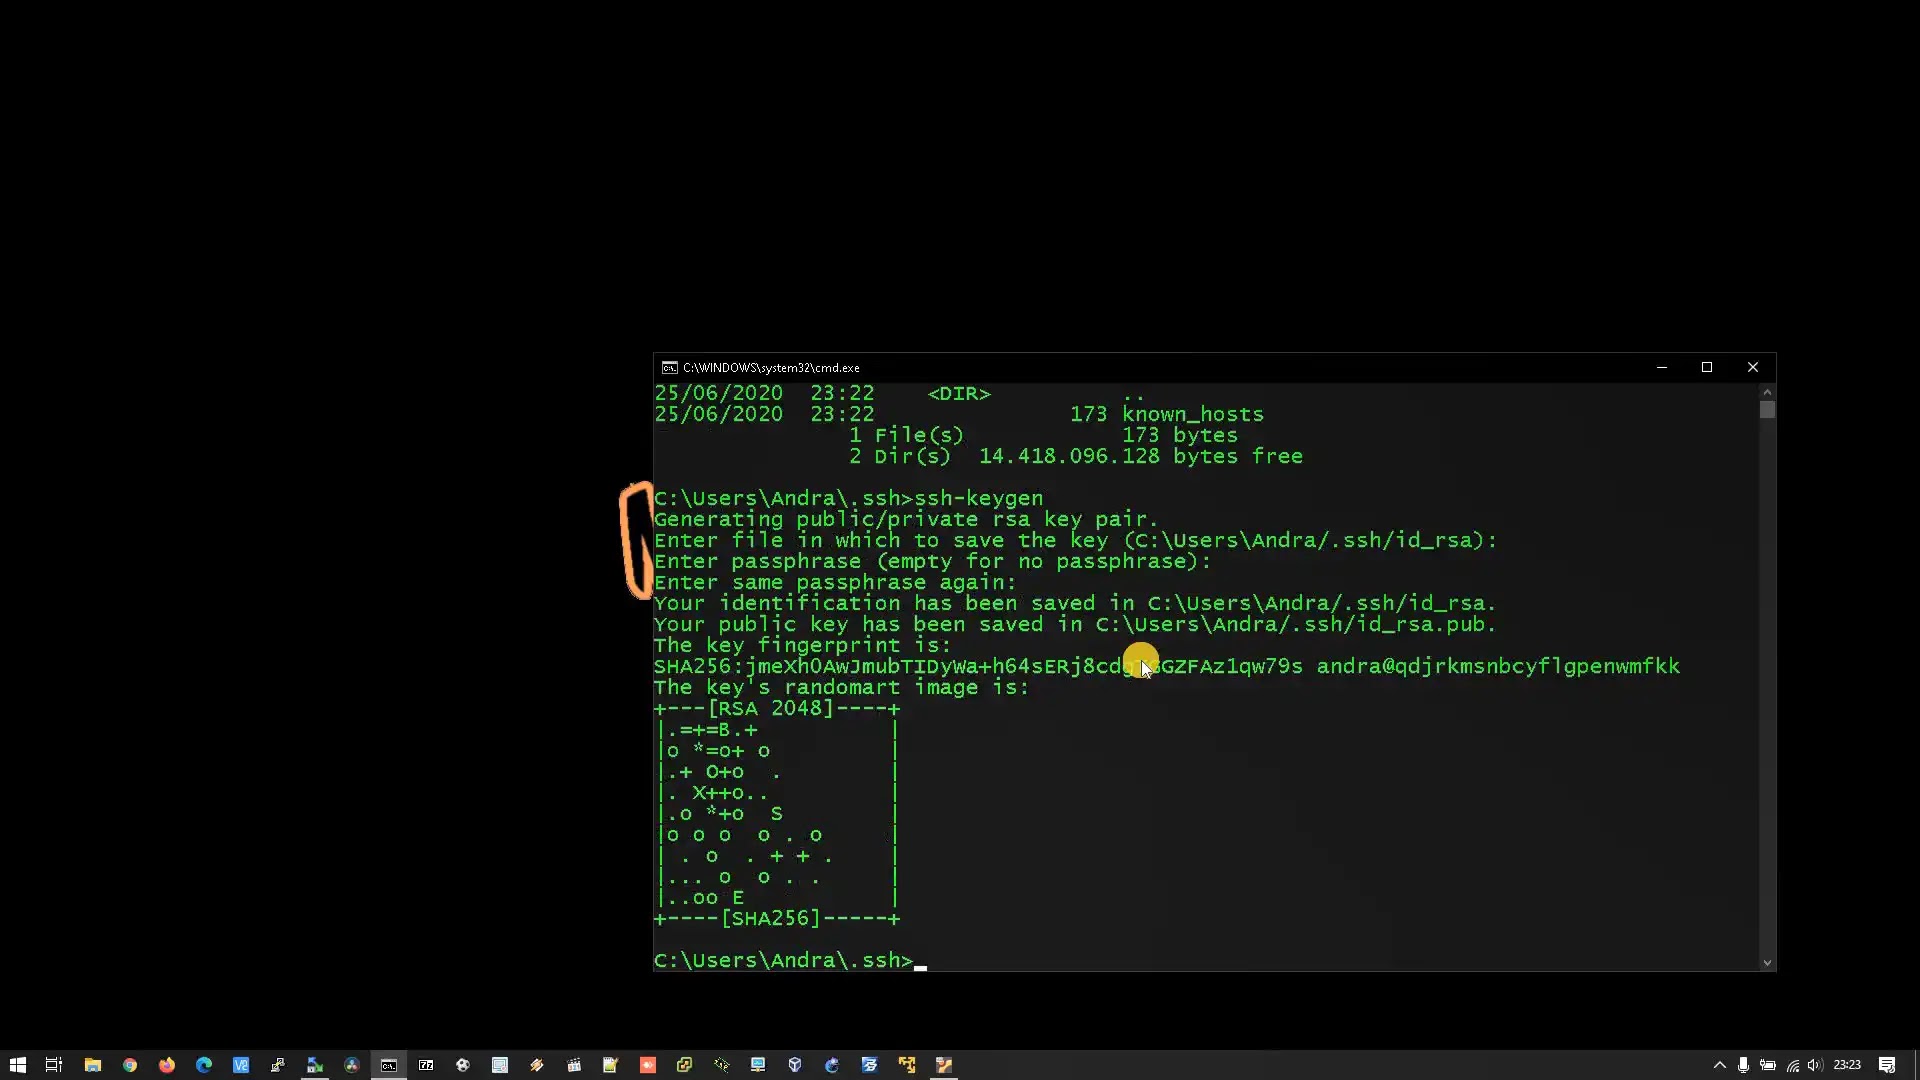
Step 3: Generate SSH Keys
To securely connect remote IoT P2P SSH Ubuntu server, you’ll need to generate SSH keys. SSH keys provide a more secure way of authenticating your connection compared to using passwords. Here’s how you can generate SSH keys:
ssh-keygen -t rsa -b 4096
Follow the prompts to create your key pair. You can choose to set a passphrase for added security.
Step 4: Copy Your Public Key to the Server
Now that you have your SSH keys, it’s time to copy your public key to the server. This will allow you to authenticate without needing a password every time you connect. Use the following command to copy your key:
ssh-copy-id user@server_ip_address
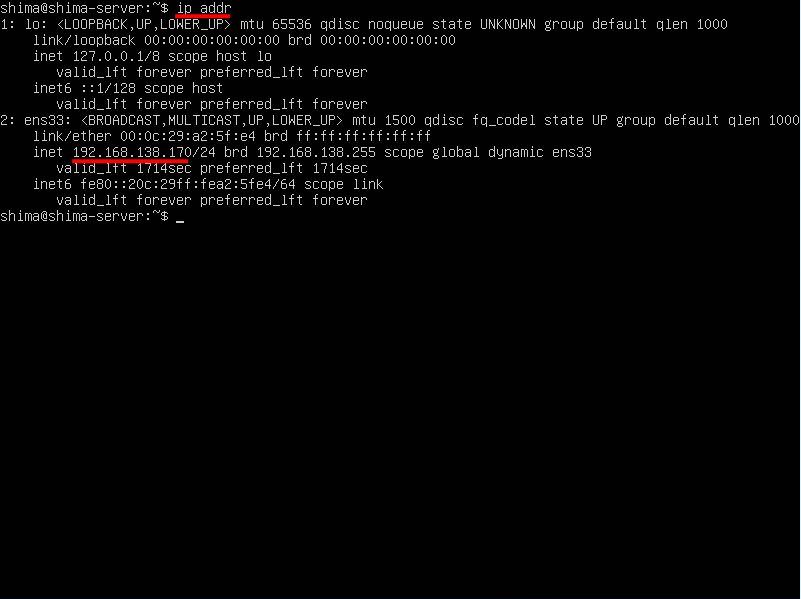
Replace "user" with your username and "server_ip_address" with the IP address of your server.
Step 5: Connect to Your Server
With everything set up, you can now connect to your server using SSH. Open your terminal and type:
ssh user@server_ip_address
If everything is configured correctly, you should be able to log in without entering a password.
Troubleshooting Common Issues
Even with the best-laid plans, things can go wrong. Here are some common issues you might encounter when trying to securely connect remote IoT P2P SSH Ubuntu server and how to fix them:
- Connection Refused: This usually happens if the SSH service is not running on your server. Check the status of SSH using the command "sudo systemctl status ssh" and restart it if necessary.
- Permission Denied: If you’re getting a permission denied error, double-check that you’ve copied your public key to the server and that the permissions on your SSH directory are correct.
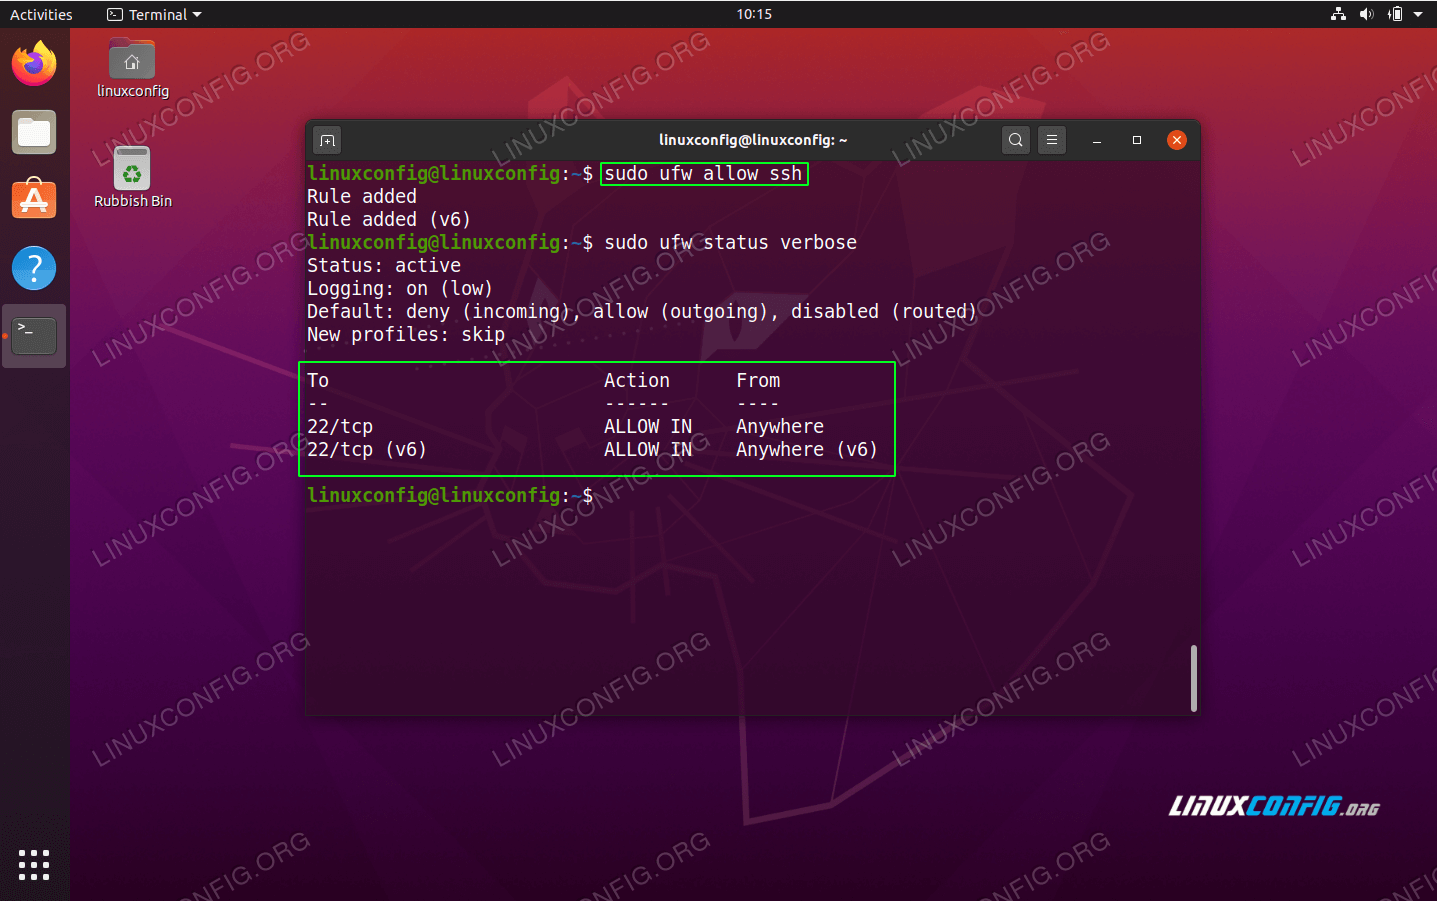
- Timeout Errors: These can occur if there’s a network issue or if the server’s firewall is blocking your connection. Ensure that port 22 is open on your server’s firewall.
By addressing these issues, you can ensure a smooth and secure connection between your IoT devices and your Ubuntu server.
Best Practices for Securely Connect Remote IoT P2P SSH Ubuntu Server
Now that you’ve got the basics down, let’s talk about some best practices to keep your setup secure:
- Use Strong Passwords: Even though SSH keys provide an additional layer of security, it’s always a good idea to use strong passwords for your server.
- Regularly Update Your System: Keeping your Ubuntu server and SSH up to date ensures that you have the latest security patches.
- Limit User Access: Only grant SSH access to trusted users. You can do this by editing the SSH configuration file located at /etc/ssh/sshd_config.
By following these best practices, you’ll significantly reduce the risk of unauthorized access to your server.
Advanced Security Measures
If you’re looking to take your security to the next level, consider implementing these advanced measures:
- Change the Default SSH Port: Changing the default SSH port from 22 to something else can help deter automated attacks.
- Enable Two-Factor Authentication: Adding an extra layer of security with two-factor authentication makes it even harder for attackers to gain access.
- Monitor Logs: Regularly checking your server’s logs can help you identify any suspicious activity.
These measures might require a bit more effort, but they’re well worth it for the added security they provide.
Real-World Applications of Securely Connect Remote IoT P2P SSH Ubuntu Server
Now that you know how to securely connect remote IoT P2P SSH Ubuntu server, let’s explore some real-world applications where this setup can be beneficial:
- Smart Home Automation: Control your smart home devices from anywhere in the world using SSH.
- Industrial IoT: Monitor and manage industrial IoT devices remotely, ensuring smooth operations.
- Remote Data Collection: Collect data from remote sensors and devices securely using SSH.
These applications demonstrate the versatility and importance of securely connecting your IoT devices using SSH on an Ubuntu server.
Data Security in IoT
Data security is a top priority when it comes to IoT devices. By securely connecting your devices using SSH, you’re taking a major step towards protecting your data. Remember, the more secure your setup, the less likely you are to fall victim to cyberattacks.
Conclusion
And there you have it—a comprehensive guide on how to securely connect remote IoT P2P SSH Ubuntu server. Whether you’re a tech enthusiast or a professional, mastering this skill is essential in today’s interconnected world. By following the steps outlined in this article, you can ensure that your IoT devices are protected and functioning smoothly.
So, what are you waiting for? Go ahead and set up your secure connection. And don’t forget to share this article with your friends and colleagues. Together, let’s make the world of IoT a safer place!
Feel free to leave a comment below if you have any questions or need further assistance. Happy coding!
Table of Contents:
- What is SSH and Why Should You Care?
- Why Choose Ubuntu Server for IoT?
- Step-by-Step Guide to Securely Connect Remote IoT P2P SSH Ubuntu Server
- Step 1: Install Ubuntu Server
- Step 2: Configure SSH on Ubuntu Server
- Step 3: Generate SSH Keys
- Step 4: Copy Your Public Key to the Server
- Step 5: Connect to Your Server
- Troubleshooting Common Issues
- Best Practices for Securely Connect Remote IoT P2P SSH Ubuntu Server
- Advanced Security Measures
- Real-World Applications of Securely Connect Remote IoT P2P SSH Ubuntu Server
- Data Security in IoT
Article Recommendations